
Running a Test Over the Web
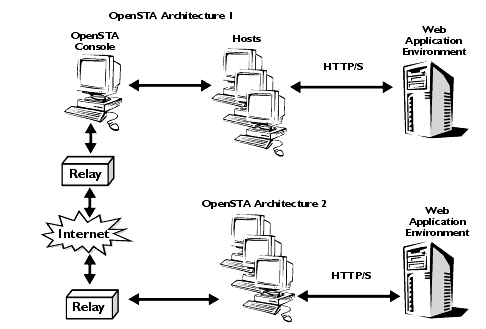
OpenSTA's distributed software architecture enables Test execution on remote Web-based Hosts. This is achieved using a Web Relay Daemon facility which allows the CORBA-based communications within the OpenSTA architecture to be transmitted between machines that are located over the Web.
The Web Relay Daemon facilitates configuration of the components that comprise the Web Relay environment. These consist of the Web Relay Daemon, a Web server and the OpenSTA architecture. Normal Test control communications use XML over HTTP. OpenSTA Web-based replay allows two modes of file transfer: HTTP or FTP. The system also allows SSL-based data transfer.
Use the Web Relay Daemon to map all the machines that need to connect to one another in an OpenSTA architecture which includes Web-based machines. These facilities offer the full range of OpenSTA communications between single or groups of Web-based machines running OpenSTA.
After configuring the Web Relay Daemon remote Hosts can be selected to run a Task Group as normal. For more information see Select the Host used to Run a Task Group.
Web Relay Daemon Architecture

Note: OpenSTA Console refers to a Host computer that has an installation of OpenSTA. This includes the OpenSTA Architecture and Commander, and may also include the Repository, where all Test related files and results are stored.
Configuring the Web Relay Daemon
The configuration of the Web Relay Daemon involves:
Configuring the Web Server
- Activate the OpenSTA Web Relay facility:
Click Start > Programs > OpenSTA > OpenSTA Web Relay. The Web Relay Daemon iconappears in the task bar.
Note: It is assumed that you already have a Web server installed that supports ISAPI.- Right-click on
and select Edit Server Settings from the pop-up menu to open the Server Settings window.
Note: If the Web Relay Daemon is inactive theicon is visible.
- Enter the port number of the local Web server in the Port field.
- Check the Use SSL option if SSL security is required.
- Type the path and root directory of the Web server in the Root Directory field.
A DLL is automatically entered in the ISAPI Extension field and a cache file in the File Cache field.- If you want to use FTP file transfer for data transmission, check the Enable FTP File Transfer option and enter your settings in the complete the optional Local FTP Server Settings fields.
- Click on Save to apply your settings.
Configuring the Relay Map
- Activate the OpenSTA Web Relay facility:
Click Start > Programs > OpenSTA > OpenSTA Web Relay. The Web Relay Daemon iconappears in the task bar.
Note: It is assumed that you already have a Web server installed that supports ISAPI.- Right-click on
and select Edit Relay Map from the pop-up menu to open the Edit Relay Map Settings window.
Note: If the Web Relay Daemon is inactive theicon is visible.
- Click on
in the toolbar to add the Relay Map settings of the remote Host you want to connect to.
- In the Edit Relay Map Settings window enter the name of the remote host in the Alias field.
- In the IP Address field, enter the IP address of the remote host.
- Type the ISAPI extension in the Extension Path field.
Note: This entry is identical to the one in the ISAPI Extension field in the Web server configuration settings.- Enter the port number of the Web server in the Port field.
- In the User Name field, enter the user name.
- Type the password in the Password field.
- Check the Use SSL option if SSL security is required.
- Click OK to confirm the Relay Map settings.
Note: Repeat this process on the remote Host to complete the mapping of the two machines.Setting the Trace Level
- Activate the OpenSTA Web Relay facility:
Click Start > Programs > OpenSTA > OpenSTA Web Relay. The Web Relay Daemon iconappears in the task bar.
Note: It is assumed that you already have a Web server installed that supports ISAPI.- Right-click on
and select Set Trace Level from the pop-up menu to open the Set Trace Level dialog box.
Note: If the Web Relay Daemon is inactive theicon is visible.
- Click
to the right of the Trace Level field and select a trace level setting from the drop down list.
Tip: The trace level you select effects the amount of information you receive about the Test executer processes if problems are encountered during a Test-run. The default setting is `None'.- Click on OK to confirm the setting.
Next Section: Glossary
Back to Contents
|
OpenSTA.org Mailing Lists Documentation feedback |