![]()
Modeling Scripts
- Modeling Overview
- SCL Representation of Scripts
- Automated Script Formatting Features
- Modeling a Script
- Variables
- MUTEX Locking
- DOM Addressing
- Developing a Modular Test Structure
- General Modeling Procedures
Modeling Overview
Modeling Scripts enables you to develop realistic Tests and improve the quality of the Test results produced.
There are extensive modeling options available within Script Modeler that can help you to develop realistic performance Tests. When you are familiar with the structure of Scripts and in particular the SCL code they are written in, you will be well equipped to model them. SCL is a simple scripting language that gives you control over the Scripts you create. It enables you to model Scripts to accurately simulate the Web activity and to generate the load levels you need against target WAEs when a Test is run.
How you model the Scripts you record or whether you choose to do so at all, depends on the functionality of the WAE you are testing and the type of Web activity you want to Test.
A key modeling technique involves the addition of variables to a Script which enable you to change the fixed values they record. For example, if a Script records login details which identify the user who conducted the original browser session, you can replace this information with a variable that changes the user login details each time the Script is replayed during a Test-run.
Variables can be incorporated into Scripts to control a variety of elements including user selections. For example, a Script may record items purchased by the user which you need to vary in order to make your Test more realistic. Introducing a variable to replace the recorded selections enables you to do this.
Using variables to change the activity and the identity of the Virtual Users enables you to use a single modeled Script to simulate multiple unique browser users when the Test is run.
Script Modeling is enhanced beyond the representation of HTTP requests with SCL and the addition of variables to a Script, by providing the capability to include objects from a Web page in a Script. HTTP/S Load provides the capability to use DOM objects from the Web pages that are saved at the same time a Script is recorded, to model the corresponding Script. This modeling technique is known as DOM Addressing and can be used to verify the results of a Test by checking that the WAE responses returned during a Test-run are correct.
If you are developing a Test which includes Scripts that run in sequence within the same Task Group you need to model the Scripts for the Task Group to replay correctly when the Test is run. If your WAE uses cookies or issues session identities, then each Script you create will contain a unique identity that has no connection to the other Scripts included in the Task Group. You need to establish a connection between the Scripts by modeling them. For more information Developing a Modular Test Structure.
Whether you are developing a modular Test structure or you are using Task Groups that reference a single Script, it is important to check that the Test is running correctly. Make use of the DOM Addressing function to help verify a Test-run. You can also run a single stepping session to check that the WAE responses are appropriate.
In addition to the SCL code, a knowledge of HTTP commands is useful in reading and modeling Scripts. Make use of the SCL Reference Guide to assist with your modeling tasks. In Script Modeler, click Help > SCL Reference to view an on-line copy of the guide.
See also:
SCL Representation of Scripts
SCL, Script Control Language, is a scripting language created by CYRANO. Within Script Modeler, it is used to write the Scripts which define the content of your Tests. Make use of SCL commands to model Scripts and develop the Test scenarios you need. Refer to the SCL Reference Guide for more information.
When a Script is recorded through the Gateway, the raw HTTP/S traffic is represented using SCL code. Scripts are written using SCL code which enables you to model them. This gives you control of the content of the Tests you create and enables you to simulate the Test scenarios required no matter how complex. Model a Virtual User by using the menu options available or by keying in the SCL commands you need. Scripts function as interactive text files, which you can edit and manipulate using methods you will be familiar with if you have used any type of text editor. You can enter text, cut and paste, search and replace text elements and variables, scroll up and down through the file and bookmark text lines.
When you open a Script you will notice that the data it contains is represented using syntax coloring to help identify the different elements. For example, SCL keywords and commands are represented in blue. A Script is divided into three sections represented by the following SCL keywords; Environment, Definitions and Code.
See also:
Automated Script Formatting Features
The Environment Section
The Environment section is always the first part of a Script. It is introduced by the mandatory Environment keyword. It is preceded by comments written by the Gateway which note the browser used and the creation date.
This section is used to define the global attributes of the Script including a Description, if you choose to add one, the Mode and Wait units, for example:
 !Browser:IE5
 !Date : 11-Dec-00
 Environment
 	 Description ""
 	 Mode        HTTP
 	 Wait        UNIT MILLISECONDS
See also:
The Definitions Section
The Definitions section follows the Environment section and is introduced by the mandatory Definitions keyword. It contains all the definitions used in the Script, including definitions of variables and constants, as well as declarations of Timers and file definitions.
 Definitions
 	 ! Standard Defines
 	 Include "RESPONSE_CODES.INC"
 	 Include "GLOBAL_VARIABLES.INC"
The RESPONSE_CODES.INC is an include file which contains the definitions of constants which correspond to HTTP/S response codes.
The GLOBAL_VARIABLES.INC file is used to hold variable definitions of global and Script scope which are shared by Virtual Users during a Test-run.
See also:
The Code Section
The Code section follows the Definitions section and is introduced by the mandatory Code keyword. It contains commands that represent the Web-activity you have recorded and define the Script's behavior. The Code section is composed of SCL commands that control the behavior of the Script.
See also:
Automated Script Formatting Features
During the recording of a Script the HTTP/S traffic is written in SCL code to produce a Script. A Script combines a variety of automatically encoded features which are incorporated during the creation process. Representing the Web activity recorded during a Web session in SCL code enables Scripts to be modeled more easily and to be replayed as part of a Test without the requirement to model.
Some of the automated formatting features are listed below:
Syntax Coloring
Script data is represented using syntax coloring to help identify the different elements. SCL keywords, commands and clauses are represented in blue, comments are green, strings are magenta, operators are red, numbers and text are black.
Generation of Timers
Generation and insertion of code to time the period that elapses between the issuing of an HTTP/S request and the loading of Web pages and the duration of Script replay.
Generation of Waits
Generation and insertion of code that suspends Script execution for a finite period. A Wait command represents a pause in browser activity.
Creation and Modification of Variables for Cookies
Automatic generation and insertion of variables into the Definitions section of a Script to replace any cookies issued by a WAE with a new variable definition and record them in the Script. Script Modeler automatically substitutes the unique session identity defined by a cookie which enables you to replay a Script as part of a Test to function as one or multiple Virtual Users.
HTTP Commands
The HTTP commands provide facilities for issuing HTTP requests for resources, examining and interrogating the response messages and synchronizing requests. The HTTP commands are as follows:
GET command: Issues an HTTP GET request to retrieve a URI.
POST command: Issues an HTTP POST request for the WAE to accept some data from the client.
HEAD command: Issues an HTTP HEAD request to retrieve a URI, but the WAE does not return the associated Web page or object.
LOAD RESPONSE_INFO BODY command: Loads a character variable with all or part of the data from an HTTP response message body for a specified TCP connection. It is used after a GET, HEAD or POST command.
LOAD RESPONSE_INFO HEADER command: Loads a character variable with all or one of the HTTP response message header fields for a specified TCP connection.
SYNCHRONIZE REQUESTS command: Causes the thread currently executing to be suspended immediately, until responses have been received for all the requests that have been issued by the thread.
CONNECT command: Used to establish a TCP connection to a nominated Host computer.
DISCONNECT command: Used to close one or all of the TCP connections established using the CONNECT command.
Text Layout and Formatting
Left aligned text including tabs and spaces, are features of a Script which are incorporated to format SCL commands and other content. This formatting aids the legibility of Scripts and has no other effect on compilation.
See also:
Modeling a Script
The Tests you develop and the Scripts they contain are largely dependent on the structure and function of the WAE(s) you are testing and the results you want to achieve. Planning and developing the appropriate Scripts is crucial in the development of a successful performance Test.
To produce the Tests you need it may be necessary to model the Scripts they contain. The following example demonstrates some common modeling procedures using Script Modeler, which you can apply in the Test development process.
The example includes the following procedures:
- Open a Script from Commander or Open a Script from Script Modeler
- Create a Variable
- Apply MUTEX Locking
- Locate Login Details and Insert Variables
- DOM Addressing
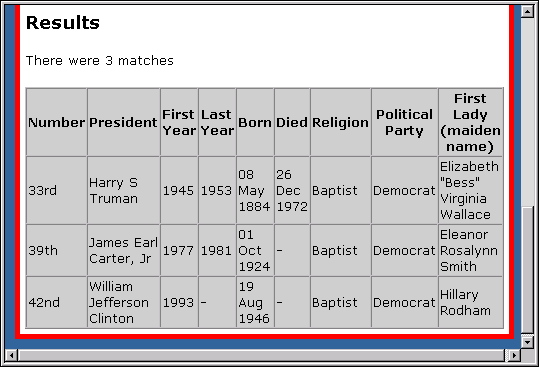
The example documents the procedures involved in modeling a user name and password to enable the simulation of multiple Virtual Users with unique identities when a Test is run. It uses a single Script captured over an Internet connection that records launching, logging on, conducting a search and then logging off from the OpenSTA demo WAE, Which US President?. The search conducted cross-references `Democrat' with `Baptist', and returns the names of three former presidents who fit into this category.
The demosite can be downloaded or launched directly, from http://opensta.org/.
For more information on SCL commands, refer to the SCL Reference Guide, which is available within Script Modeler's on-line help system.
Note: See Developing a Modular Test Structure, for an overview of modeling Scripts to create a modular Test incorporating a sequence of two or more Scripts.
See also:
Developing a Modular Test Structure
Open a Script from Commander
- In the Repository Window within Commander, double-click
Scripts, to expand the directory structure.
- Double-click on the Script (or Include file) you want to open represented by
or
.
See also:
Open a Script from Script Modeler
Open a Script from Script Modeler
- Click
, or select File > Open.
- In the Open Capture dialog box, double-click the Script you want to open or select a Script and click OK.
See also:
Variables
When you create a new variable you need to choose the attributes it embodies in order to perform the functions you want when a Test is run. You can assign the properties you require from within the Variable Creation dialog box. To setup new variables select Variable > Create, or to edit existing variables, select Variable > Modify. Use these dialogs to control the function of your variables by selecting the settings you need.
The settings you apply are represented within the Script by SCL code, or option clauses, which are depicted in blue, bold text within the Script Pane. Once you have created a variable it is represented as a text string within the Definitions section of the Script. The example below displays a variable named USER, which contains one SCL keyword and two SCL option clauses:
 CHARACTER*512 USER ( "user1", "user2", "user3" &
 , "user4", "user5" ), LOCAL, RANDOM
The CHARACTER keyword defines the type of variable, LOCAL identifies its scope and RANDOM indicates the method this variable uses to select values. The entry *512, indicates the maximum character length the variable can contain. The variable values are listed after the variable name. For more information on variables refer to the SCL Reference Guide.
See also:
Variable Options
All the options relating to developing new variables can be accessed from within the Variable Creation dialog box, click Variable > Create. However, you can define the prefix you use for new variables before you create them.
See also:
Specify The Prefix Name for Your Variables
Specify The Prefix Name for Your Variables
- Open a Script, then select Options > Variables.
- Enter the prefix text in the Variable Options dialog box.
- Note: The name you give to a variable must conform to the rules of OpenSTA Datanames and cannot be longer than 16 characters.
- Click OK.
Variable Scope Options
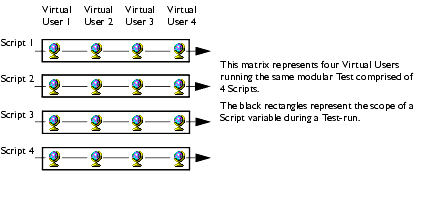
The Scope of a variable determines which Virtual Users and Scripts can make use them during a Test-run. The default variable scope is Local.
There are four variable scope settings available:
Local Scope Variables
Local scope variables are only accessible to the Virtual User running the Script in which they are defined. They cannot be accessed by any other Virtual Users or Scripts. Similarly, a Script cannot access any of the local variables defined within any of the Scripts it calls.
A Local scope variable can only be used by Virtual User 1 in Script 1, Virtual User 1 in Script 2, Virtual User 2 in Script 1, etc. Each Virtual Users copy of the variable can only be referenced and used by them.
Script Scope Variables
Script scope variables can be accessed by any Virtual User running the Script in which they are defined.
A Script scope variable can be used by Virtual Users 1 to 4 in Script 1 or by Virtual Users 1 to 4 in Script 2 etc. There is only one copy of the variable which can be shared by any user. It can only be referenced and used within the Script that it is defined.
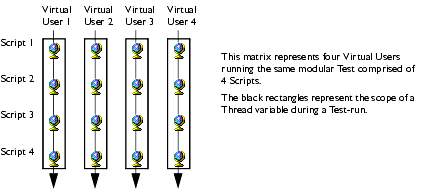
Thread Scope Variables
Thread scope variables are accessible from any Script run by the Virtual User, or thread, that defines them.
A Thread scope variable can be used by Virtual User 1 in Scripts 1-4, Virtual User 2 in Scripts 1-4, etc. Each Virtual User has their own copy of the variable which cannot be referenced or used by another Virtual User. A Thread scope variable must be defined in every Script in the sequence that uses it. Alternatively, define a thread scope variable in the Global_Variables.INC file to include it in every Script.
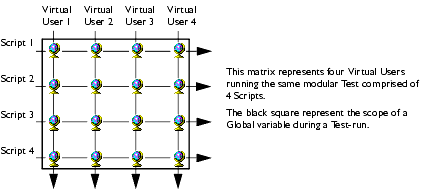
Global Scope Variables
Global scope variables are accessible to any thread running any Script under the same Test Manager, that is, any Script in a particular Test-run.
A Global scope variable can be used by any Virtual User in any Script. However, it must be defined in each Script it is to be used in or included in the Global_Variables.INC file.
See also:
Variable Value Source
The Value Source option enables you to create new values for your variables or to use an existing source which can be externally accessed, from a file or a database. If you want to utilize an external value source select either File or Database from the Value Source drop down list and locate your value data.
The default option is the Value List.
See also:
Variable Order
The Order option controls how the variable values are selected during a Test-run. The choice for the selection of variable values is Sequential or Random. Choosing a sequential order for the selection of variable values results in values being used consecutively from your value list.
The Random order option dictates that a variable value is selected randomly from a list or range, when the variable is used in conjunction with the GENERATE command (refer to the SCL References Guide for more information). The values are selected in a different order each time they are generated. This is achieved by generating a different seed value for the variable each time the variable is initialized. Local scope variables are initialized when a Test-run begins. Script scope variables are initialized by the first thread to run the Script.
See also:
Variable Type
The variable Type option enables you to define whether a variable is numeric or text type. Typically the Character option is used for modeling user names, passwords, and other text based elements. The Integer type variable facilitates the introduction of equations into the variable for more advanced modeling tasks.
See also:
Create a Variable
Note: For more information on creating variables see Variables.
- Open a Script, then select Variable > Create.
- In the Variable Creation dialog box, enter a name for your new variable. In this example the name is USERNAME.
- Note: The name you give must be a OpenSTA Datanames.
- Select the Scope of your variable. In this example the selection is Script. Click
and choose from:
- Local: Only accessible to the Virtual User running the current Script.
- Script: Accessible to any Virtual User running the current Script.
- Thread: Accessible to any Script run by a specific Virtual User.
- Global: Accessible to any Script and any Virtual User.
- Note: The scope of a variable relates to which Virtual Users and Scripts can make use of the variables you create.
- Select the Value Source of your variable. In this example the selection is Value List. Click
- Select the order in which the variable values are selected when a Test is run. In this example the selection is Sequential. Choose from:
- Select the data types of the variable. In this example the selection is Character. Choose from:
- Click Next when you have made your selections.
- In the Value List dialog box you need to enter the variable values, or names that will represent the Virtual Users you need when the Test is run. In this example there are five values or user names entered manually within the Value List dialog box, as described below.
- You can enter the variable values you need freehand, by double-clicking inside the Value text box or click the
, and enter your variable value.
- Or, click Generate Values to automate the process. In the generation Parameters dialog box, give your values a prefix, then specify the number of Virtual Users you want by entering a number range in the From and To text boxes. The Step function controls
- After you have created your variable values, click OK to return to the Value List dialog box and use the Value List toolbar buttons to manipulate your entries.
- Click Finish when the setup process is complete.
- Repeat this process to create the PASSWORD variable, which your five Virtual Users will need in order to access the Which US President? WAE.
Note: This WAE requires a password to be the reverse spelling of the login name.CHARACTER*512 USERNAME ( "phillip", "allan", "david" & , "robert", "donna" ), SCRIPT CHARACTER*512 PASSWORD ( "pillihp", "nalla", "divad" & , "trebor", "annod" ), SCRIPT
- The variables are now ready to be substituted for the original login identity recorded in the Script. But before you can do so you must apply MUTEX locking SCL code to ensure there are no sharing violations between Virtual Users during a Test-run.
- Select Capture > Syntax Check or click
, in the Capture/Replay Toolbar, to compile the Script.
- It is a good idea to replay the Script to check the activity you have recorded before you incorporate it into a Test.
Select Capture > Replay or click, in the Capture/Replay Toolbar. The replay activity is displayed in the Output Pane.
- Click
, to save the Script, or click File > Save.
Edit a Variable
- Open a Script, then working in the Script Pane, find the variable you want to edit in the Definitions section.
- Click an insertion point within the variable string, click Variable > Modify, and make your changes in the Variable dialog box.
- Click
MUTEX Locking
MUTEX locking is a straightforward procedure that you can perform in order to ensure a Test-run which simulates unique, multiple Virtual Users is successful.
During a Test-run that simulates Virtual Users with unique identities by using a Script scope value list, it is possible for them to acquire the same variable values. When a Test is run the Virtual Users specified by the Task Group settings, take their identities sequentially from the list defined in the Script's USERNAME variable, in this example. This list of unique identities defined by a variable's list is shared by the Virtual Users running a Test, which means that when several Virtual Users access the list in rapid succession user identities can be duplicated in the milliseconds between one Virtual User claiming and setting their identity, by the next Virtual User accessing the list. MUTEX locking is used as a fail safe command that prevents this from happening. A variable supporting unique identities for Virtual Users during a Test-run needs to be shared so all Virtual Users can access the variable. Therefore, the scope of the variable must be Script or global scope.
In the current example, the user name and password details of Virtual Users must remain unique for the Test to produce useful results. Inserting a MUTEX lock prevents other Virtual Users from acquiring the MUTEX and therefore ensures the unique identities of each Virtual User when a Test is run.
AQUIRE MUTEX is the SCL command which gives a Virtual User exclusive access to the MUTEX you define, which in this case is a user name and password value contained in the USERNAME and PASSWORD variables. The SCL code assigns the first user name value from the specified variable and makes a local copy of this value, which prevents any other Virtual User from using it, until the MUTEX is released with RELEASE MUTEX command. For more information about MUTEX and the additional options available, refer to the SCL Reference Guide.
See also:
Apply MUTEX Locking
- Open a Script, then working in the Script Pane, find the login details in the Code section.
- You must insert the MUTEX command before the login details referenced in the Script, which in this example is before the PRIMARY POST URI entry.
- The name you give your MUTEX element is up to you, for this example LOGIN is used.
 	 ACQUIRE MUTEX "LOGIN"
 	 NEXT USERNAME
 	 NEXT PASSWORD
 	 SET MY_USERNAME = USERNAME
 	 SET MY_PASSWORD = PASSWORD
 	 RELEASE MUTEX "LOGIN"
- The NEXT command loads a variable with the next sequential value from the USERNAME and PASSWORD variables. When the NEXT command is first executed, it will retrieve the first value. The variable value set is treated as cyclic, so when the last value has been retrieved, the next value retrieved is the first in the set.
- The SET commands make local copies of the variable value loaded using the NEXT command.
- You need to declare the MUTEX elements you have created in the Definitions section. In the current example they should appear as below:
 	 CHARACTER*512 MY_USERNAME, LOCAL
 	 CHARACTER*512 MY_PASSWORD, LOCAL
- Select Capture > Syntax Check or click
- It is a good idea to replay the Script to check the activity you have recorded before you incorporate it into a Test.
Select Capture > Replay or click- Click
See also:
Locate Login Details and Apply USERNAME and PASSWORD Variables
Locate Login Details and Apply USERNAME and PASSWORD Variables
- Open a Script, then working in the Script Pane, find the login details in the Code section so you can edit the code and apply your variables.
- Use the scroll bars in the Script Pane, or the text search facility to locate the section of the Script which records the login data.
- Tip: Right-click inside the Script Pane and select Find, or click
, then in the Find dialog box type in loginid and click OK. Press F3 to find the next instance.
- In the OpenSTA demosite the login details you are looking for are located below the first Primary Post in the Code section of the Script. The relevant section of code is illustrated below:
 	 PRIMARY POST URI"http://demosite.opensta.org/gsg-v1 HTTP/1.0"ON 2 &
 	 HEADER DEFAULT_HEADERS &
 	 ,WITH {"Accept: application/vnd.ms-excel, application/msword,
 	 	 application/vnd.ms-powerp" & "oint, image/gif, image/x-xbitmap,
 	 	 image/jpeg, image/pjpeg, */*", &
 	 	 "Referer: http://demosite.opensta.org/gsg-v1", &
 	 	 "Accept-Language: en-us", &
 	 	 "Content-Type: application/x-www-form-urlencoded", &
 	 	 "Content-Length: 22", &
 	 	 "Pragma: no-cache"} &
 	 ,BODY "loginid=mike&passwd=ekim"
- Login details are located after the SCL clause BODY.
,BODY "loginid="+MY_USERNAME+"&passwd="+MY_PASSWORD
- Click
- Your Script is now adequately modeled to simulate the Virtual Users required. However, it useful to incorporate Document Object Model, DOM, references to help you verify the results you get when a Test is run. This modeling method is known as DOM Addressing.
- Select Capture > Syntax Check or click
- It is a good idea to replay the Script to check the activity you have recorded before you incorporate it into a Test.
Select Capture > Replay or click- Click
See also:
DOM Addressing
DOM Addressing is a modeling technique that enables you to effectively validate a Test by checking that the HTML responses are correct.
The term DOM Addressing describes the ability to access specific and unique elements within the DOM (Document Object Model) or Web page and use it to model the corresponding Script.
When a Script is recorded, the Web pages returned from the WAE in response to browser requests issued are saved in a .ALL file, at the same time as the Gateway produces the .HTP or Script file. These HTML responses include DOM information plus other categories of data that are directly related to, and dynamically linked with the Script.
During a Test-run the contents of a particular DOM signature or DOM object address, can be recovered dynamically. This enables modeling of the dynamic nature of some Web pages by:
- Providing information in the Script that can be used to verify that the application is working. For example, by enabling a text-matching Test to be performed.
- Enabling the adaptive loading of objects (probably via secondary GETs) that are part of the dynamic content of the current page, but were not present in the recorded page.
- Emulating the clicking of different links within a Web page that may be unique for individual users.
After you have modeled and run the Test open the Test Report Log from the Results Window to display the responses generated.
Producing a meaningful performance Test requires an thorough knowledge of the WAE functionality you are testing. In the current example, a Virtual User launches the Which US President? WAE and conducts a search, cross referencing `Democrat' with `Baptist', which returns three former presidents who fit in to this category. Knowing how the WAE should behave in these circumstances enables you to model the Script to report the results returned by the WAE to each Virtual User involved in the Test-run.
See also:
Developing a Modular Test Structure
Addressing a DOM Element
In this example the DOM Addressing procedure is used to verify the Test results by checking that the Web pages returned from the WAE during Test-run and search results they contain are correct.
- Open a Script, then working in the Script Pane, search for a PRIMARY POST URI or a PRIMARY GET URI in the Code section.
Shortcut: Click in the Address Bar and select the URL you want to view from the list to move to this entry in the Script.- Click the URL Details button
, in the Standard Toolbar, or click View > URL Details, to open the .ALL file. The GET or POST you selected is highlighted by the appearance of
, on the left of the selected URL text string.
- In the Query Results Pane, click on the HTML tab to display the Web page and confirm it contains the results you want to model.
- After you have located the returned Web page that contains the search results, click the DOM tab to display the Document Object Model structure of the Web page.
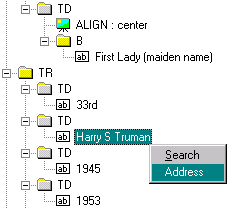
- The first returned president is Harry S Truman. Scroll down through the DOM tree structure to locate the DOM object that contains this reference, or use the Search function. Right-click in the DOM view of the Query Results Pane and click Search, then enter the text you want to search for in the Find dialog box.
- In the Addressing dialog box, give your variable a name, in this case PRESIDENT, and click OK.
 	 LOAD RESPONSE_INFO BODY ON 3 &
 	 INTO PRESIDENT &
 	 ,WITH  "HTML(0)/BODY(1)/TABLE(2)/TBODY(0)/TR(0)/TD(0)/
 	 	 TABLE(4)/TBODY(0)/TR(1)/TD(1):TEXT:(0)"
- The text string that appears after the ,WITH command indicates the path or location, of the DOM object within the DOM structure, also known as the DOM address.
- When you add a DOM address variable the details are stored automatically in the Definitions sections of the Script. Scroll up to check that the DOM variable has been registered. In this example it appears as illustrated below:
CHARACTER*512 PRESIDENT ,LOCAL
- Note: A Script will not compile unless all variables correctly are recorded in the Definitions section of the file.
- The DOM variable produces no output after Test-run without additional modeling, this involves entering an SCL command.
- Below the ,WITH clause and the DOM address, in the Code section of the Script, click an insertion point and press Return.
- Then type REPORT or LOG, along with any comments you want included in your results.
- The REPORT command writes a message to the Report log, and the LOG command writes a message to the Audit log, which can be viewed after the Test-run is complete from within Commander.
- In the current example, the SCL command and comments are structured as illustrated below:
 	 LOAD RESPONSE_INFO BODY ON 3 &
 	 INTO PRESIDENT &
 	 ,WITH  "HTML(0)/BODY(1)/TABLE(2)/TBODY(0)/TR(0)/TD(0)/
 	 	 TABLE(4)/TBODY(0)/TR(1)/TD(1):TEXT:(0)"

 	 REPORT  "USER ", MY_USERNAME, " SEARCHED FOR DEMOCRAT-BAPTIST AND
 	 	 GOT ", PRESIDENT
- The MY_USERNAME entry ensures that the results generated are written to file for each Virtual User. The comment text also appears to give context to the results and PRESIDENT refers to the DOM variable which calls the WAEs responses for each Virtual User during a Test-run.
- Select Capture > Syntax Check or click
- It is a good idea to replay the Script to check the activity you have recorded before you incorporate it into a Test.
Select Capture > Replay or click- When you are happy with your Script, click
- Click File > Close to close the current Script, or click File > Exit to shutdown Script Modeler.
Developing a Modular Test Structure
Developing a modular Test structure involves creating two or more Scripts then combining them sequentially in a Test to represent a continuous Web browser session when the Test is run. For example, this may include a log on Script, followed by one or more Scripts that record the Web services that you want to test, then a log off Script.
A modular Test can take longer to develop than a Test that references a single Script, but once the modular structure is in place maintaining it is easier. It is then possible to re-record and replace individual Scripts which have been affected by functional changes to a WAE, rather than re-recording all the Web activity which would be necessary if your Test used a single Script.
When Web services are modified and Tests need updating you will only need to recreate the affected Scripts within a modular Test structure. This means that you do not waste time re-recording and re-modeling every Script in the sequence, which is work you would have to do if you use a single Script to record a browser session.
Creating Scripts that encapsulate specific Web activity also enables them to be used in different Tests. This can help reduce the amount of time you would otherwise need to spend on recording and modeling Scripts.
With a modular Test structure in place you can configure the Script Tasks in a sequence to repeat using the Task settings option, enabling you to simulate multiple searches by a single Virtual User. For example if one of the Scripts in the Task Group sequence records a search, you can apply a Task iteration setting to this Script Task during Test development in order to repeat the search as often as required during a Test-run. To further enhance the realism of the browser activity simulated during a Test-run you could model the search Script by replace the item searched for with a variable to simulate multiple unique searches using the same Task Group
Recording Scripts and then building a modular Test is no problem if the WAE you are targeting does not generate cookies or URL session identities. But if the WAE under Test uses cookies, you need to be able to manipulate the session identities they record to enable the Scripts to run in sequence. The session identity needs to be shared between Scripts by creating a new variable which unifies the cookies recorded in different Scripts. Minor edits to the Scripts you want to include in your Test are required, as well as the use of the Global_Variables.INC to record the new session identity variable. The Global_Variables.INC is a resource file that can be used to make variable values available across all Scripts in the Repository.
Open the Global_Variables.INC and define your variable, then reference the variable name at the end of each Script in the sequence. At the beginning of each subsequent Script assign the global cookie value to the Script so that they all share the same identity and function correctly during a Test-run.
See also:
Model Scripts to Run in Sequence During a Test-run
Model Scripts to Run in Sequence During a Test-run
This following procedure documents the modeling of Scripts for incorporation into a Task Group in sequence, in order to simulate a continuous Web browser session when replayed during a Test-run.
Note: The procedure references Scripts which were captured over an Internet connection from the OpenSTA demo WAE, Which US President?. Aspects of this procedure will vary when applied to Scripts recorded from different WAEs depending on their functionality and in particular how they handle cookies.
- Ensure that Script Modeler is set to automatically model cookies before you record Scripts. For more information see Select Automatic Cookie Modeling.Open the Global_Variables.INC file from Script Modeler by selecting Tools > Edit and double-clicking GLOBAL_VARIABLES.inc in the Edit File dialog box.
- Enter the variable type, name and scope, in this example:
CHARACTER*1024 SESSIONID, THREAD
- Click
, to save the file or click File > Save.
- Open the Script that you want to run first in the Task Group sequence.
- The Script you are modeling may contain several cookies each with different functions. You need to identify which one contains session ID information.
- To do this search for the Load Response_Info Header command in the Script to identify the WAE issued cookie that contains session ID information. For example:
 	 Load Response_Info Header on 1	 	 &
 	 	 Into cookie_1_0 	 &
 	 	 ,WITH "Set-Cookie,findpresid"
- In this example findpresid is the cookie issued by the WAE that contains session ID information and has been assigned to the modeled cookie, cookie_1_0.
- Scroll down to the end of the Script and click an insertion point between the Endif and Exit commands and type the following:
Set SESSIONID = cookie_1_0
- Click
- Then compile the Script by clicking
in the Capture/Replay Toolbar, or selecting Capture > Syntax Check. Compilation results are reported in the Output Pane.
- Open the Script that you want to run next in the Task Group sequence.
- Before the first HTTP request find the first automatically modeled cookie.
Click in the Address Bar and select the first HTTP request in the list to move to this entry in the Script. In this example the command appears:Set S_cookie_2_0 = "findpresid=Dave,996069766"Set S_cookie_2_0 = SESSIONID
- Replace the cookie value with the variable you have created, SESSIONID, for example:
- The cookie now has the same session ID value as the cookie at the end of the first Script.
- Scroll down to the end of the Script insert the SESSIONID variable between the Endif and Exit SCL commands. Click an insertion point between these commands and enter the variable name. For example:
Set SESSIONID = cookie_2_0
- Note: In this example cookie_2_0 contains the session ID information
- Save and compile the Script.
- Repeat steps 9-12 in the other Scripts that you want to include in the modular Test structure.
- Note: The last Script in the sequence does not need to include the Set command details at the end of the Script.
- After you have modeled the Scripts you are ready to develop the Test by adding them to a Task Group in the planned order.
- Tip: Try single stepping the Task Group to check that it behaves as you expect, in particular to make sure that the modular Task Group replays as a continuous Web browser session. Use the Single Step Results option to view the HTTP responses recorded during Task Group replay to check your modeling has been successful and that the Test is valid.
- You can also access the Web server log to check that the Scripts are running in sequence.
See also:
Developing a Modular Test Structure
General Modeling Procedures
Comprehensive information on SCL commands and their syntax is documented in the SCL Reference Guide, which is available within Script Modeler's on-line help system.
Find and Replace Variables in Strings
Single Stepping, Comments
Comments can be added to Scripts in order to give some explanation of their content when monitoring Task Group replay during a single stepping session.
The function of HTTP requests included in a Script are not always obvious, particularly if the WAE you are testing issues the same or similar HTTP requests, but the functionality of each Web page returned is different. You can add Comments before URLs for example, to indicate which commands are about to run.
During a single stepping session Comments can be displayed when a Task Group is replayed. As replay proceeds the information you have added about HTTP requests or other Script items is displayed, which can help to make monitoring Task Group replay easier.
Comments can be inserted while recording a Script or added afterwards. During a recording session, click the Add Comment button
in the Capture/Replay Toolbar, or select Capture > Insert Comments. The time taken to add Comments is not included in Scripts.
Comments may be incorporated into Scripts either on lines by themselves or embedded in statements and commands. In both cases, they are identified by the SCL command !USC:.
See also:
Add a Single Stepping Comment to a Script
Add a Single Stepping Comment to a Script
Note: Comments can be added during Script recording using the Add Comment button
- Open a Script, then working in the Script Pane, move to the position where you want to add a Comment.
- Click an insertion point in the Script where you want to add a Comment and type: !USC:
- Enter the Comment text after !USC:
- Compile the Script to check that it will replay correctly by clicking
- Click
- Note: Comments can be displayed in the Script Item list during a single stepping session. Click
in the single stepping toolbar to show and hide them.
See also:
Transaction Timers
Scripts can be modeled to include Transaction Timers that are used to measure the duration of user-defined HTTP transactions within a Script-based Task Group when a Test is run.
During Script creation Timers are automatically generated to measure the period of time that elapses between an HTTP request being issued and the corresponding Web page being loaded, and also the duration of Script replay. Transaction Timers enable you to measure a series of HTTP requests that represent a complete Web browser transaction.
A Transaction Timer defines a sequence of SCL code within a Script in order to measure the duration of the HTTP transaction delimited. An HTTP transaction is a user-defined sequence of SCL code within a Script contained by the Start Timer TRANS_ and the End Timer TRANS_ SCL commands in the Code section of a Script.
During a single stepping session you can display Transaction Timers when a Task Group is replayed. As the replay proceeds the Start and End Transaction Timer commands are listed along with the HTTP requests that comprise the HTTP transaction they are measuring.
Transaction Timer results are available in the Timer List, the Timer Values v Active Users graph and the Timer Values v Elapsed Time graph.
See also:
Add a Transaction Timer to a Script
Add a Transaction Timer to a Script
- Open a Script, then working in the Script Pane, move to the Definitions section of the Script to define your Transaction Timer name using the Timer statement.
- Click an insertion point in a new line and type Timer TRANS_ and the Transaction Timer name, which must be an OpenSTA Dataname, for example:
Timer TRANS_First_Purchase- Click an insertion point in the Code section of the Script where you want to start your Transaction Timer and type Start Timer TRANS_ and the Timer name, for example: Start Timer TRANS_First_Purchase
- Click an insertion point in the Code section of the Script where you want to end your Transaction Timer and type End Timer TRANS_ and the Timer name, for example: End Timer TRANS_First_Purchase
- Click
- Click
- Note: Transaction Timers can be displayed in the Script Item list during a single stepping session. Click
in the single stepping toolbar to show and hide them.
- Note: Results generated using Transaction Timers are displayed in the Timer List, the Timer Values v Active Users graph and the Timer Values v Elapsed Time graph.
See also:
Wait Commands
Wait SCL commands are generated and inserted automatically during Script creation and represent a pause in Web browser activity. When a Script is replayed during a Test-run, Script execution is suspended for a finite period according to the Wait command values included in the Script.
As response times improve during WAE development, the Wait command values recorded no longer reflect the speed of the Web application. In these circumstances you can either re-create the Script or edit existing Wait command values to improve the accuracy of the Script when it is replayed during a Test-run.
During a single stepping session you can display Wait commands to help make monitoring Task Group replay more transparent. As the replay proceeds the Wait commands are displayed including the time value of each Wait. Wait command time periods are either recorded in seconds or milliseconds depending which unit is defined by the Wait UNIT statement in the Environment section of the Script.
See also:
Edit Wait Values in a Script
- Open a Script, then locate a Wait command you want to edit.
- Click an insertion point within a Wait command.
- Delete the existing value and enter the new Wait period in its place.
- Compile the Script to check that it will replay correctly by clicking
- Click
- Note: Wait commands can be displayed in the Script Item list during a single stepping session. Click
in the single stepping toolbar to show and hide them.
See also:
Call Scripts
The Call Script SCL command enables you to execute a Script that is not included in a Task Group when a Test is run. A Script modeled to include this command can call a named Script, or a variable can be introduced to call a Script at random. When this command is executed control is transferred to the called Script. Control is returned to the calling Script when the called Script exits. There is no limit on the number of Scripts that may be called by a Script.
During a single stepping session you can display the Call Script commands included in a Script which can help improve your monitoring options during Task Group replay. As replay proceeds Call Script commands are executed and the called Script's name is displayed in the Script selection box in the Single Stepping Test Pane. The Script items it contains such as HTTP requests, are displayed in the Monitoring tab.
Scripts that are called by another Script cannot be configured before running a single stepping session because they are not part of the Task Group being tested. But when Task Group replay is paused at a breakpoint, or if you are using the Single Step button to run a Task Group, it is possible to insert breakpoints and to select the requests whose HTTP responses you want to capture.
See also:
Call a Script
- Open a Script, then working in the Script Pane, move to the position where you want to call a Script from. This must be in the Code section of the Script.
- Type Call Script " " inserting the Script name between the quotes, for example:
- Call Script "SHOP_1"
- Note: Refer to the SCL Reference Guide, available within Script Modeler's on-line help system for more information on the Call Script command.
- The Call Script command must also define which variables are to receive values passed as parameters from a calling Script.
- Search for the Entry command within the Script and copy the information it includes.
The Entry command is the first item in the Code section of the Script.- Add this information to your Call Script command, for example:
- Compile the Script to check that it will replay correctly by clicking
- Click
- Note: Call Script commands are displayed in the Script Item list during a single stepping session.
See also:
Syntax Check
When you perform any of these modeling procedures, it is important to verify the syntax by compiling the Scripts you record and model, to ensure the validity of the code and contents. If compilation fails an error message(s) appears in the Output Pane, in which case you may need to repeat the modeling procedure to resolve the problem. After compilation it is a good idea to replay the Script to check the activity you have recorded. When you are happy with your modeled Script make sure you save your work.
See also:
Syntax Check a Script
- Open a Script, then select Capture > Syntax Check to compile the Script.
- It is a good idea to replay the Script to check the activity you have recorded before you incorporate it into a Test.
Select Capture > Replay- Click
Find and Replace Variables in Strings
If a variable string within a Script is excessively long it is truncated. The variable string is wrapped around on to the next line in the Script and the sections of the string are joined by an ampersand at the end of each line. If you need to replace a truncated variable you cannot enter the variable name to locate it using the Find and Replace function because the breaks in the text string will not always occur in the same place. The Search and Replace in Strings function is an intelligent search facility that can help you locate and substitute truncated variables.
See also:
Search and Replace a Variable in Strings
Search and Replace a Variable in Strings
- Open a Script, then select Variable > Replace In Strings.
- Enter the name of the variable in the Find text box and the new name in the Replace text box.
- Click Replace All to substitute the new variable name.
- Click
Find Script Text
Use the Find function to locate any of the elements contained within the current Script.
- Open a Script, select click Edit > Find
- Enter the text to search for in the What text box, or click
- Click Find to run the search.
- Press F3 to locate the next instance of the search item.
Find and Replace Script Text
Use the Find and Replace function to locate and substitute any of the elements contained within the current Script.
- Open a Script, then select Edit > Replace.
- Enter the text to search for in the Find text box and enter the replacement text in the Replace with text box. Click
- Click Find Next to run the search, click Replace to substitute an instance, click Replace All for a global substitution.
Find in SCL Files
Use the Find In SCL Files function to locate and substitute any of the elements contained within the current Script.
- Open a Script, then click
.
- Enter the text you want to locate in the current and other Scripts.
- Click Find to run the search, click Cancel.
|
OpenSTA.org Mailing Lists Further enquiries Documentation feedback CYRANO.com |

 in the Variable Toolbar.
 to delete it, click
  to move the item up the list and click
  to move the item down.
 in the Variable Toolbar.
 in the Variable Toolbar.
 , or press Ctrl + F. Right-click within the Script Pane and click Find.